🔗 Accessing the Web Interface
The IntelliAGS has a built-in web server accessible from any browser on your local network.
Connection Methods
| Method | Address |
|---|---|
| mDNS (Recommended) |
http://intelliags.local
|
| IP Address |
http://192.168.x.x (Check your router or OLED display for the IP)
|
| AP Mode (Setup) |
http://192.168.10.10 (When in Access Point mode)
|
| Remote Portal |
https://portal.intellioffgrid.com (Requires VPN mode)
|
⚙️ Operation Modes
IntelliAGS supports four operation modes that determine network behavior:
Mode 0: Standalone
- Access Point only
- No internet required
- Local web interface
- eMMC data logging
- IP: 192.168.10.10
Mode 1: Web + NTP
- Ethernet primary
- WiFi fallback
- Web UI + time sync
- No MQTT/Home Assistant
- mDNS: intelliags.local
Mode 2: Web + MQTT
- Ethernet primary
- WiFi fallback
- MQTT to Home Assistant
- Real-time alerts
- OTA firmware updates
Mode 3: Web + VPN
- Intelli VPN tunnel
- Remote access via portal
- portal.intellioffgrid.com
- Secure IPv6 connection
- Remote OTA updates
📱 Web Interface Pages
📊 Dashboard
The main dashboard provides real-time monitoring of all generator parameters.
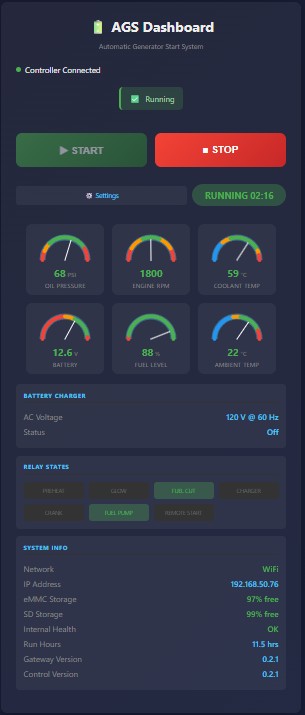
Dashboard showing generator running with all sensor readings
Sensor Gauges
| Gauge | Description |
|---|---|
| Battery Voltage | Real-time battery voltage with color-coded status (green 12-14.5V) |
| Oil Pressure | Engine oil pressure in PSI (green 30-95 PSI when running) |
| Coolant Temperature | Engine coolant temperature in °C (green below 100°C) |
| Fuel Level | Tank fuel level percentage (warning below 25%) |
| RPM | Engine speed in revolutions per minute (green 1730-1870) |
| AC Voltage | Generator output voltage (120V/240V) |
| AC Frequency | Generator output frequency (50/60 Hz) |
Control Buttons
| Button | Function |
|---|---|
| START | Initiates generator start sequence (preheat → glow → crank → run) |
| STOP | Initiates graceful shutdown with cooldown period |
| Charger Toggle | Enable/disable the battery charger |
Status Indicators
⚙️ Settings Page
Configure all IntelliAGS parameters through the web settings page.
Network Settings
| Setting | Description |
|---|---|
| Operation Mode | Select Standalone (0), Web+NTP (1), Web+MQTT (2), or Web+VPN (3) |
| WiFi SSID | Your WiFi network name |
| WiFi Password | Your WiFi network password |
| MQTT Broker | IP or hostname of your MQTT broker (e.g., Home Assistant) |
| MQTT Port | MQTT broker port (default: 1883) |
| MQTT Username | MQTT authentication username |
| MQTT Password | MQTT authentication password |
Engine Settings
| Setting | Description |
|---|---|
| Max Coolant Temp | Shutdown temperature threshold (40-150°C) |
| Min Oil Pressure | Minimum running oil pressure (0-115 PSI) |
| Min Fuel Level | Minimum fuel to allow start (0-100%) |
| Crank Time | Maximum cranking duration (0.5-15 sec) |
| Start Retries | Number of start attempts (1-10) |
Glow Plug Settings
| Setting | Description |
|---|---|
| Glow Mode | PWM (fixed time) or SmartGlow (resistance-based) |
| Preglow Time | Maximum preglow duration (0-60 sec) |
| Preglow Duty | Preglow PWM percentage (0-100%) |
| Skip Temp | Skip preglow above this coolant temp (0-50°C) |
Portal vs Local Access
Some settings are restricted when accessing through the remote portal for security:
| Setting Section | Portal Access |
|---|---|
| VPN Settings | Read-only (inputs disabled) |
| Network Settings | Hidden (configure locally to prevent lockout) |
| Log Export | Hidden (downloads require local access) |
| Calibration | Disabled (safety - require physical presence) |
📝 Logs Page
View and download system logs for troubleshooting and monitoring.
Log Types
| Log Type | Description |
|---|---|
| Data Logs | Continuous sensor readings logged during generator operation (CSV format) |
| Error Log | System events, faults, alerts, and hourly heartbeats |
Log Storage
- Primary Storage: eMMC (internal flash) - always available
- Archive Storage: SD card - old logs archived when eMMC reaches 80% capacity
- Log Format: CSV files organized by date (YYYYMMDD_datalog.csv)
⬆️ OTA Firmware Updates
Update your IntelliAGS firmware over-the-air without physical access.
Update Sources
| Source | Description |
|---|---|
| Web (HTTPS) | Download latest firmware directly from IntelliOffGrid servers |
| SD Card | Flash firmware files uploaded to the SD card (local access only) |
Firmware Components
| Component | Description |
|---|---|
| Controller | RA4M1 microcontroller firmware (engine control, sensors, OLED) |
| Gateway | ESP32-S3 firmware (WiFi, web server, MQTT, OTA) |
| WebAssets | Web interface files (HTML, CSS, JavaScript) |
Update Process
- Navigate to /ota.html on your IntelliAGS
- Click "Check for Updates" to see available versions
- Click "Update All" or update individual components
- Wait for the update to complete (progress bar shown)
- The device will automatically reboot after updating
SD Card Update (Offline)
For offline updates or when internet is unavailable:
- Download firmware files from the IntelliOffGrid website
- Copy to SD card root:
controller.bin- Controller firmwaregateway.bin- Gateway firmwarelittlefs.bin- Web assets
- Insert SD card into IntelliAGS
- Navigate to OTA page and click "Flash from SD"
🔄 Network Failover
IntelliAGS supports automatic network failover for maximum reliability.
Priority Order
- Ethernet (Primary) - Hardwired connection via RJ45 port
- WiFi (Fallback) - Connects to configured WiFi network
- Access Point (Setup Only) - Creates "IntelliAGS" network for initial setup
Failover Behavior
| Scenario | Behavior |
|---|---|
| Ethernet Connected | Uses Ethernet for all traffic, WiFi stays connected as backup |
| Ethernet Unplugged | Seamlessly switches to WiFi, no reboot required |
| Ethernet Plugged In | Switches to Ethernet, MQTT reconnects automatically |
| Both Unavailable | Continues retrying, never falls back to AP after initial setup |
🌍 Remote Access (VPN)
Access your IntelliAGS from anywhere using the IntelliOffGrid Portal.
Requirements
- Operation Mode 3 (VPN) configured
- Internet connection on IntelliAGS
- Portal account at portal.intellioffgrid.com
Portal Features
| Feature | Availability |
|---|---|
| Dashboard | Full access - real-time monitoring |
| Start/Stop | Full access - remote control |
| Settings | Limited - sensitive settings require local access |
| OTA Updates | Web source only - SD uploads require local access |
| Logs | View only - downloads require local access |
🔧 Troubleshooting
Cannot Access Web Interface
| Issue | Solution |
|---|---|
| intelliags.local not working | Try the IP address directly (shown on OLED). mDNS may not work on all networks. |
| Connection refused | Ensure IntelliAGS is powered on and connected to the same network. |
| Page loads slowly | Clear browser cache or try a different browser. |
| No IP shown on OLED | Check network cable or WiFi credentials. Hold MENU for 2s to enter WiFi config mode. |
Settings Not Saving
| Issue | Solution |
|---|---|
| Changes lost after reboot | Ensure you clicked "Save Settings" button before navigating away. |
| Save button unresponsive | Refresh the page and try again. Check browser console for errors. |
OTA Update Issues
| Issue | Solution |
|---|---|
| Update fails at 70-80% | Network timeout. Updates will resume automatically on retry. |
| SD files not detected | Ensure files are in root folder with correct names (controller.bin / gateway.bin / littlefs.bin) |
| Device won't boot after update | Hold MENU button during power-on to enter recovery mode. |